Establish a direct network connection between Princh and your organization's printers by using either the Internet Printing Protocol (IPP) or the more secure Internet Printing Protocol Secure (IPPS).
When configuring a direct network connection to your printer from the Princh Cloud, you have the option to choose from different types of direct network connections. The two primary connection protocols available are the Internet Printing Protocol (IPP) and the more secure Internet Printing Protocol Secure (IPPS). Princh strongly advises using IPPS if your printer supports it, as it offers enhanced security features. However, if IPPS is not an option, IPP is a reliable and also secure alternative that is compatible with the majority of modern day printers.
NOTE: Before attempting to establish a connection between Princh and the printer, using either IPP or IPPS, please ensure that the protocol has been enabled through the printer settings.
How to configure a Princh printer via a direct network connection:
- Select the "Connectors" tab to the left on the screen in the Princh Administration Panel.
- Select "Edit" on the printer you would like to connect and proceed to press the blue pencil icon next to "Printer Connection URl".
- The following screen will appear:
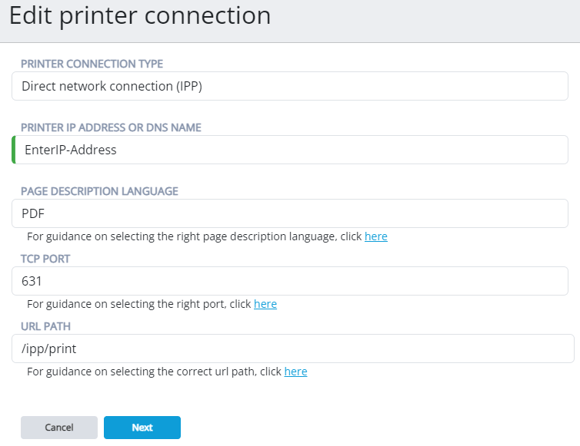
- Printer Connection Type - Select either 'IPP' or 'IPPS' from the available list of 'Printer Connection Types'. While both protocols are suitable options, there are some differences:
-
- IPP: 'Internet Printing Protocol' (IPP) is a secure way of printing over a network using the internet, which removes the necessity of physically connecting a printer to devices. IPP utilizes opportunistic encryption through an HTTP upgrade.
- IPPS: 'Internet Printing Protocol Secure' (IPPS) is a secure printing application that performs SSL encrypted communication when using IPP. IPPS ensures that encryption is always active, utilizing immediate encryption through HTTPS.
-
- Printer IP Address or DNS Name - Input the IP address or DNS name of the printer. The IP or DNS name can be identified through the printer settings.
- TCP Port & URL Path - Select the TCP port specific to your printer make and model, which can be adjusted or identified through the printer settings. If it fails, try other variations on the TCP port and URL path, which may align with your printer make and model.
If you don't know which port to use for your specific printer, we recommend referring to the commonly used formats below or reaching out to Princh Support for further assistance:
Printer Manufacturer Connect via IPP(S) (Recommended) Connect via Windows Print Queue Ricoh 631/443 9100 Konica Minolta 631/443 9100 Xerox 631/443 9100 Canon 80/443 9100 Toshiba 631/443 9100 Brother 631/443 9100 Kyocera 631/443 9100 HP 631/443 9100 Lexmark 631/443 9100 Sharp 631/443 9100
- Printer Connection Type - Select either 'IPP' or 'IPPS' from the available list of 'Printer Connection Types'. While both protocols are suitable options, there are some differences:
- Depending on the connection status that prompts:
- If the printer successfully connected, restart the connector to confirm the changes.

- If the printer did not successfully connect, we recommend setting it up with an alternative connection type or contacting Princh Support for further assistance.
- If the printer successfully connected, restart the connector to confirm the changes.
If you are using Princh Copy & Scan as part of your organization's solution, please refer to our article on how to configure a connection to a printer scanner device using eSCL.