When connecting your Printer via Princh you will have the option to select between different connection types. If your printer make and model does not support either a Secure Network Connection(IPPS) or Direct network connection (IPP), which is highly recommend, it is also possible to connect the printer using a Windows Print Queue.
If your printer make and model does support either IPPS or IPP, please refer to THIS GUIDE.
How to manually create a Princh printer using a Windows Print Queue.
- Navigate to "Settings" using the Windows search bar, then proceed to "Printers & scanners".
- Click the button "Add device".

- Identify your printer from the list of available printers to add and configure.
- If your printer does not appear for selection automatically, please click the option "Add manually".

- Select the option "Add a printer using an IP address or hostname".

- Princh suggests configuring the Device type as "TCP/IP device" and making use of the printer's IP address for optimal connectivity. Proceed to enter the IP address of the printer and click "Next".
- If you have already downloaded a printer driver, you can choose to uncheck the option "Query the printer and automatically select the driver to use" in order to manually select your preferred driver. Additionally, please note that you can change the driver at any time after the initial setup.

- If you have already downloaded a printer driver, you can choose to uncheck the option "Query the printer and automatically select the driver to use" in order to manually select your preferred driver. Additionally, please note that you can change the driver at any time after the initial setup.
- Enter a name for the printer that is easy to recognize. This name will be utilized by the Princh Cloud Connector to establish a connection with the printer, so it is advisable to keep it straightforward for clarity and ease of use. Once done, proceed to click "Next".
- Make sure that the printer sharing option is disabled by leaving the corresponding checkbox unchecked. Once confirmed, click "Next" to proceed. Your Windows Print Queue will now be successfully created.

- If your printer does not appear for selection automatically, please click the option "Add manually".
How to establish a connection between the Princh Cloud and the Windows Print Queue.
- Navigate to the Princh Administration panel and click the 'Connectors' tab in the menu to the left.
- Press the blue 'Edit' button on the desired printer you want to connect or change.

- In the Printer Connection Type drop-down menu, select "Windows Printer Queue".
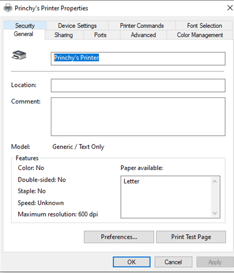
- Copy the local printer queue name from the printer properties.
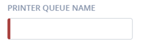
- Paste or input the local printer queue name in the printer connection window in the Princh Administration Panel and proceed with the button 'Next'.
- Based on the prompted connection status:
- If the printer successfully connected, restart the connector to confirm the changes.

- If the printer did not successfully connect, please contact Princh Support for further assistance.
- If the printer successfully connected, restart the connector to confirm the changes.