The embedded Princh Cloud Connector
A connector is an instance of the Princh Cloud Connector service that enables admin users to connect local physical printers to Princh via the Administration Panel.
Each connector created via the Administration Panel is unique and can only be installed on one printer server. Hence, if you have multiple Ricoh devices as part of your Princh solution, each will need to have a unique connector created and installed.
If you are unsure whether your Ricoh device supports the embedded Princh Cloud Connector, please reach out to Princh Support for additional information.
How to set up the Princh Cloud Connector?
- Log in to the Princh Administration Panel with an admin account and navigate to the "Connectors" tab.
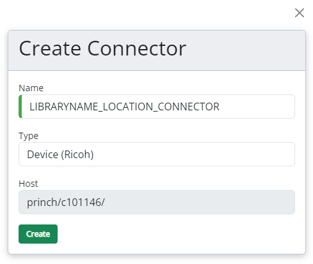
- Create a new connector by selecting the button "+ Create Connector".
- Name the newly created connector. We highly recommend using your preferred naming convention, e.g. printer location for quick identification and access. Select the type "Device (Ricoh)".
- Assign a printer to the connector
- Follow this guide on how to assign a printer to a connector.
- Download the connector from our repository, which can be found at:
- https://packages.princh.com/android/ricoh/any/PrinchConnector/production/
- When the URL is entered into the address bar of any browser, the installation file for the embedded connector will automatically begin downloading.
- https://packages.princh.com/android/ricoh/any/PrinchConnector/production/
- After downloading the connector, you can install the file from the web interface of your Ricoh device. To access the web interface, simply open any supported browser and enter the IP address of your chosen Ricoh device into the address bar.
- Make sure the IP-address is reachable from the PC or server, which is being used for the install to ensure the web interface is accessible.
- When on the Ricoh web interface, log in with administrator rights.
- After logging in, navigate to "Device Management" in the menu most commonly found on the left and select "Configuration" from the options provided.
- Locate the "Extended Feature Settings" and select "Install".
- Select "Local File" and choose the downloaded connector installation file.
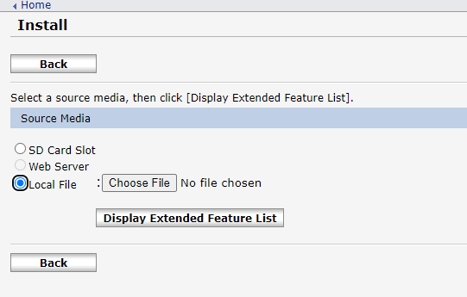
- After uploading the connector installation file, click on the "Display Extended Feature List" button. It is important to note that no immediate changes will be visible once you click this button. Please wait patiently until the page displays the complete list of extended features. This process may take a few minutes.
- After the extended feature list is displayed, you can select the "Princh Connector" checkbox from the list and click the "Install" button. The installation process for the "Princh Connector" will then begin, and you will be notified with a message once it is finished.
- After the extended feature list is displayed, you can select the "Princh Connector" checkbox from the list and click the "Install" button. The installation process for the "Princh Connector" will then begin, and you will be notified with a message once it is finished.
- At this point, you will need to access the Ricoh panel, which is physically located on the Ricoh device. You can do this either remotely or by being physically present at the device.
- Remote: In the Ricoh web interface, navigate back to the "Device Management" menu. Now select "Remote Panel Operation" from the list of options.
- If you are unable to see the "Remote Panel Operation" option, you will need to enable it in the printer settings..
- Physical: Simply go the Ricoh device and wake the panel by pressing it.
- Remote: In the Ricoh web interface, navigate back to the "Device Management" menu. Now select "Remote Panel Operation" from the list of options.
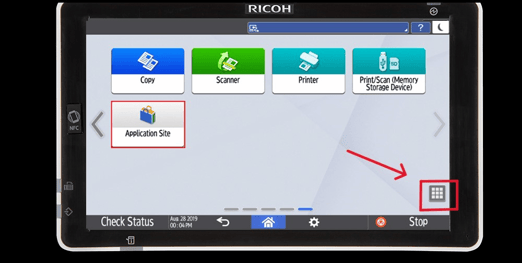
- The "Princh Connector" will now appear as an application on the Ricoh panel. Simply press the "Princh Connector" application and log in using your credentials for the Princh Administration Panel.
- If you cannot find the Princh Connector application on the home screen, simply press the button specified in the image below. This will take you to a page where you can see all the applications that are currently installed on your device.
- If you cannot find the Princh Connector application on the home screen, simply press the button specified in the image below. This will take you to a page where you can see all the applications that are currently installed on your device.
- Once logged in to the application, the "Connector Status" will be visible in the top right corner.
- If the status is "Downloading", please wait until the download is finished
- If the status is "Running", the connector is online. Navigate to the Princh Administration panel and the tab "Connectors" to ensure, that the status has changed to online.
- The connector should now be successfully online and ready for use.
If further assistance is needed with the Embedded Princh Cloud Connector, please contact Princh Support.