The Princh Cloud Connector comes in two types. The first type of Princh Cloud Connector is intended for use with print servers or PCs. The second type is specifically designed for compatible Ricoh MFPs, allowing you to run the connector software directly on the MFP itself.
NOTE: Each connector created via the Administration Panel is unique and can only be installed on one printer server or Ricoh MFP. Hence, if you have multiple printer servers or Ricoh MFPs as part of your Princh solution, each will need to have a unique connector installed.
How to create a new Princh Cloud Connector in the Princh Administration Panel?
- Log in to the Princh Administration Panel with an admin account and navigate to the "Connectors" tab from the menu to the left.
- Create a new connector by selecting the button "+ Create Connector".
- Name the newly created connector. We highly recommend using your preferred naming convention, e.g. server name for quick identification and access.
- If the Princh Cloud Connector software is to be installed on a print server or PC, select the option "Server".
- If the Princh Cloud Connector software is to be installed on a compatible Ricoh MFP, select the option "Device (Ricoh)".
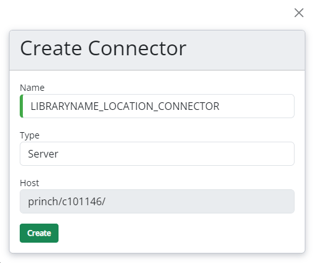
- The new Connector is now created and ready to be installed.